
Setting up MTA-STS using Azure Static Web Apps
Mail Transfer Agent Strict Transport Security is a reasonably new protocol, that helps protect email you're being sent from interception. Here's how to set it up with Azure static web apps.

I couldn't find any articles or guidance on how to set up MTA-STS policy hosting using Azure so had to work this out, including a false start (which I'll describe below). Here's my guide which I hope you find useful.
Disclaimer: This advice is provided as-is without any warranty (express or implied). Ensure that you fully understand the implications of what you are doing and the impact this could have on the deliverability of email to your domain. Remember also that using cloud resources comes at a cost, and that cost will be paid by you. The costs aren't expected to be high, but you should monitor those as you would when consuming any cloud service.
What is MTA-STS?
MTA-STS, or Mail Transfer Agent Strict Transport Security to give its full name, is a protocol where an email server that wants to email you will look to see if you have specified an MTA-STS policy. In this policy you stipulate which mail servers handle email for your domain. If the sender finds a policy it will only communicate with the email servers you've specified, and that communication will be done over TLS v1.2 or greater.
An advantage of MTA-STS is that an attacker in the middle of the sender and recipient cannot force the sender to downgrade the security to send over plain text. Note that MTA-STS doesn't make email a bullet proof, 100% secure message sending mechanism though and there are still other risks.
Can't I just use Azure (blob) Storage?
Short answer: no.
So this was my false start. "Blob storage" is just a way of storing files, in this case in the cloud, without caring necessarily about the underlying file system or structure. In Amazon's world this would be S3, and in Microsoft's Azure it's called, cunningly, Azure Storage.
I created my MTA-STS policy and a Storage account, went to create a folder called .well-known only to find that Azure won't let folders start with a . (dot / period). "Aha", I thought, I'll just use a re-write rule to forward the request to the .well-known folder. Sadly this doesn't work for MTA-STS, and the reason why is shown in the protocol's RFC (request for comments):
Policies fetched via HTTPS are only valid if the HTTP response code is 200 (OK). HTTP 3xx redirects MUST NOT be followed, and HTTP caching (as specified in [RFC7234]) MUST NOT be used.
This meant having to switch to Azure Static Web Apps, which is what this tutorial will cover. Incidentally, if you want to host MTA-STS with AWS' S3 and CloudFront that's a bit less complicated and I've published a tutorial for that here.
Prerequisites
Your email server must allow TLS inbound connections for SMTP, using TLS version 1.2. If you're unsure of the configuration then it's best to check before proceeding.
As we're using Azure you'll need an Azure tenant plus permissions to create resources inside an Azure subscription. You will also need to have an Azure DevOps environment set up. I won't cover how to do that here, as it's just another Azure service you can consume, but there's more information on Microsoft's site here. This tutorial assumes you have some experience with git and Azure DevOps.
Finally you'll need to have DNS control, or be authorised to request someone makes changes on your behalf.
Azure Devops: Create your repo & add files
Inside Azure DevOps create a new project and then clone your project's repo to your local machine. In my case I cloned with git over SSH, to a local directory on my laptop.
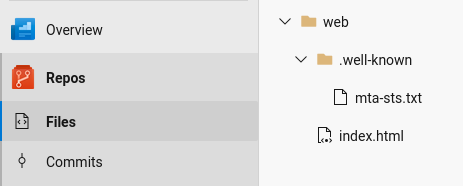
Once you've got the repo cloned you'll need to create the file structure required for your Azure Static Web App. I recommend keeping this simple, given there's only going to be your policy file in here, and optionally a friendly index.html file to tell accidental visitors what the site is for. I suggest:
- Create a directory called
web - (optional) Create
index.htmlinsidewebwith your friendly message (see below) - Inside
webcreate a directory called.well-known - Inside
.well-knowncreate yourmta-sts.txtpolicy (see below)
Friendly message - index.html
Your MTA-STS domain isn't designed for humans to browse to it, but that could happen. If you go to https://mta-sts.jonco-it.co.uk/ you'll end up looking at my friendly message. An example for you to use is below:
<!DOCTYPE html>
<html lang="en">
  <head>
    <meta charset="UTF-8">
    <meta http-equiv="X-UA-Compatible" content="IE=edge">
    <title>MTA-STS policy</title>
    <meta name="description" content="MTA-STS policy" />
    <meta name="robots" content="index,follow" />
  </head>
  <body>
      <h1>MTA-STS policy</h1>
      <p>This web site is just for serving our MTA-STS settings.  There is no other content here.</p>
  </body>
</html>
Your MTA-STS policy - mta-sts.txt
This file goes inside the .well-known directory you created earlier. I won't go into detail explaining how to create this policy, as that's outside the scope of this tutorial, but it will look something like the below code fragment.
version: STSv1
mode: testing
mx: your-domain-here.org.uk
max_age: 86400
Note that the above policy is in testing mode. While the policy is set like this there's no impact to email flow into your mail server.
Commit the files and push to Azure DevOps
Once you've authored your files you'll need to add them to git and push to DevOps. Commands like the below will suffice:
git add web/index.html
git add web/.well-known/mta-sts.txt
git commit -m "Create MTA-STS policy"
git push
If you've not used git before then I strongly recommend asking for help or doing some reading before you proceed. Helpfully, git will give you some pointers if it doesn't like what you've done.
Once that's pushed to Azure DevOps you'll see the file structure described above shown under Repos > Files, as shown below:
Azure: Create a resource group
We'll switch to the main Azure portal for the next part. For items that can be logically grouped I like to create a resource group. This has the advantage that we can delegate administration to others later, or when we no longer need the resources we can simply delete the resource group, deleting everything inside it.
In the Azure portal click create resource. You'll then be presented with a list of potential resources, like below:
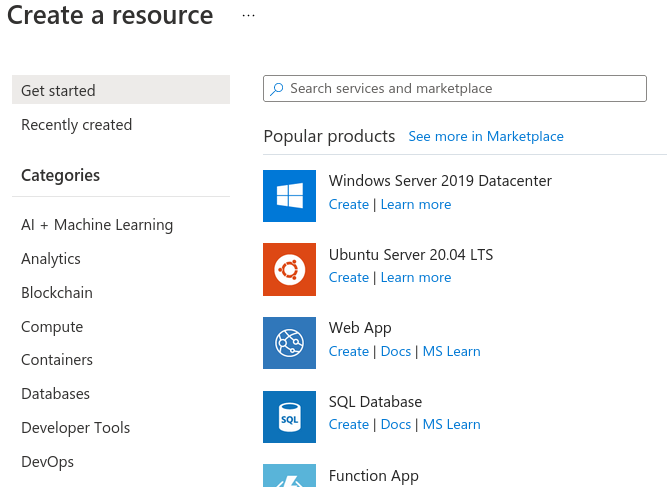
In the search box type resource group and click it in the search results. Then click create and proceed through the forms. You'll be asked which Azure subscription to create the resource group in (relates to billing) and which region to position the group in.
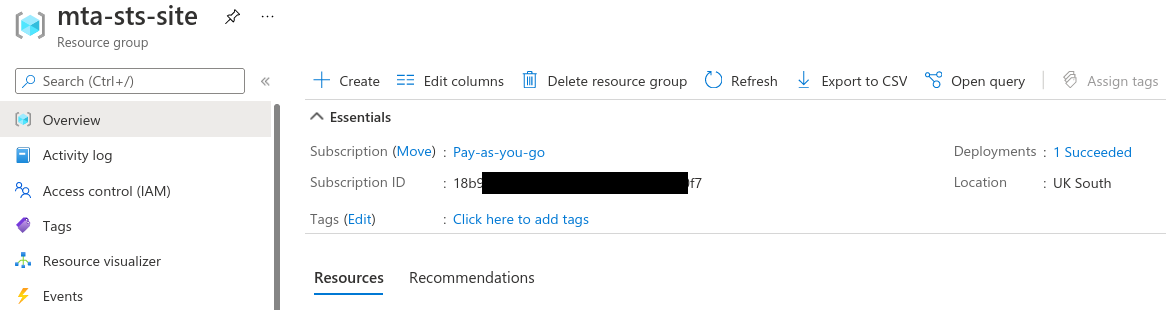
I called my resource group mta-sts-site and added a tag called service with a value of mta-sts. Once created, click on your resource group to open it in Azure:
Azure: Create a Static Web App
Once viewing the resource group we want to create a Static Web App resource, so from the create button follow the now familiar process of creating a new resource. As before you'll need to complete the form and the screenshot below shows my configuration. Obviously you'll need to set this as is appropriate to your needs. Add tags as necessary (I like tags, so I again used a name of service and value mta-sts for mine)
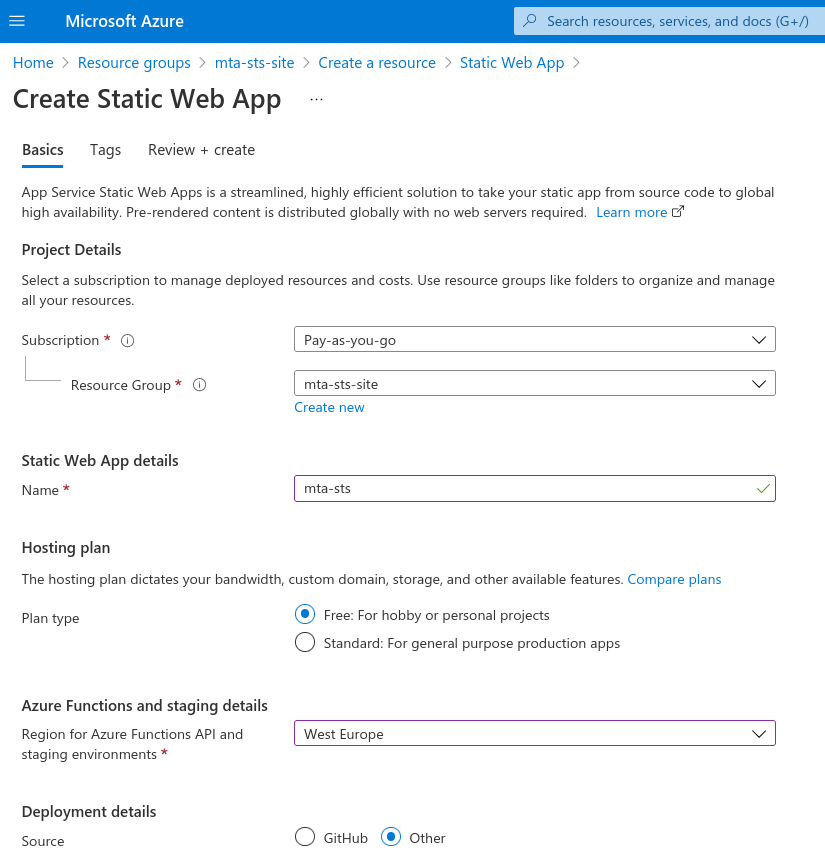
Note that the source for the web app is specified as other. This is because we'll be sourcing our site from Azure DevOps.
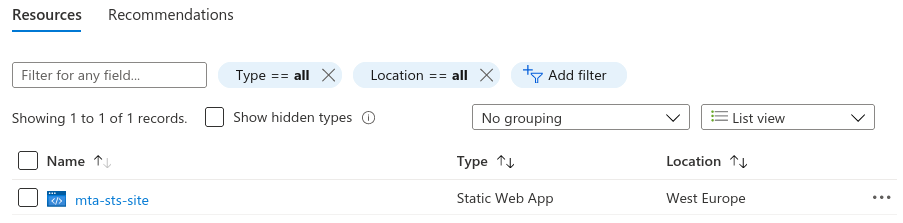
Inside your resource group you'll now see the static web app you just created:
Azure: Add custom domains to the web app
In order for MTA-STS to work it looks at mta-sts.your-domain-here.org.uk (so mta-sts.jonco-it.co.uk in my consultancy's case). By default, your Static Web App will just have a random name like unkind-orange-086b48903.azurestaticapps.net (that's a made up example) so we need to add a custom domain.
Open the mta-sts-site static web app and then choose custom domains from the settings on the left. Next click add and specify the custom domain name you want and click next. Follow the instructions to create the relevant DNS records (CNAME) to validate your custom domain and, once that's propagated, Azure will have mapped the static web app to your chosen domain. You'll also have a free certificate provided for it which is necessary for MTA-STS.
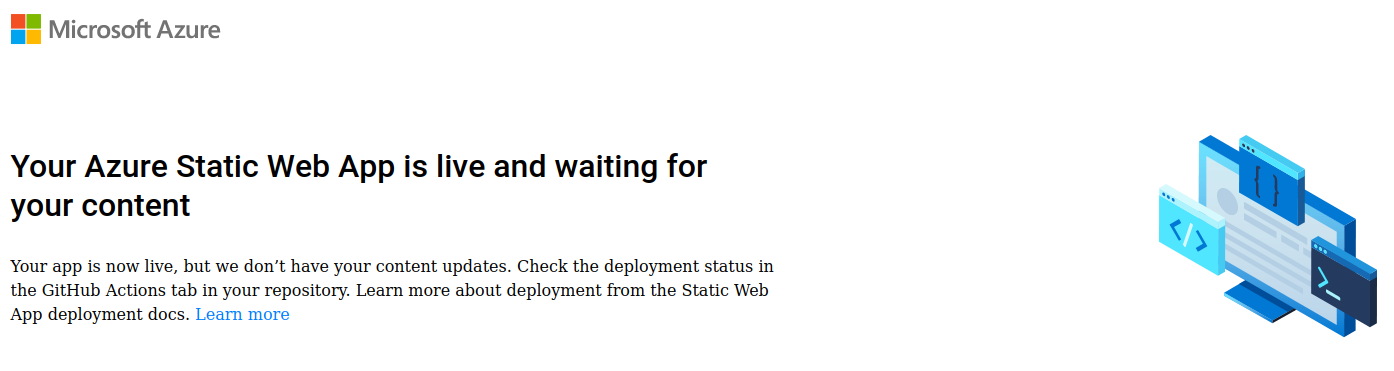
At the moment you'll get this when you browse to either the default site name or your custom one:
For more information, see Microsoft's documentation on this.
DevOps: Deploy to your Static Web App
I'm conscious this tutorial is getting long, and that I followed a pretty good Microsoft article to deploy my static web app. I suggest having a look at this document to get your MTA-STS policy deployed into your static web app.
Note that if you've followed my file structure above you'll need to specify an app_location as '/web', so your azure-pipelines.yml will look like this:
trigger:
  - main

pool:
  vmImage: ubuntu-latest

steps:
  - checkout: self
    submodules: true
  - task: AzureStaticWebApp@0
    inputs:
      app_location: '/web'
      azure_static_web_apps_api_token: $(deployment_token)
Create your MTA-STS DNS record
You will need a DNS TXT record for _mta-sts.your-domain-here.org.uk (so _mta-sts.jonco-it.co.uk in my case) to show MTA-STS is supported. Any time you update your MTA-STS policy you need to update the id in the record, so it's helpful to use a numerical ID. For _mta-sts.jonco-it.co.uk my current TXT record says
v=STSv1; id=202112041647The id value I'm using is simply the date and time that I make the change, so that ID was set on 4th December 2021 at 16:47.
Test your MTA-STS policy works
There's a neat tool at https://aykevl.nl/apps/mta-sts/ that will give you a report on your MTA-STS status. Simply enter your mail domain and click Check! and you'll get a short report:
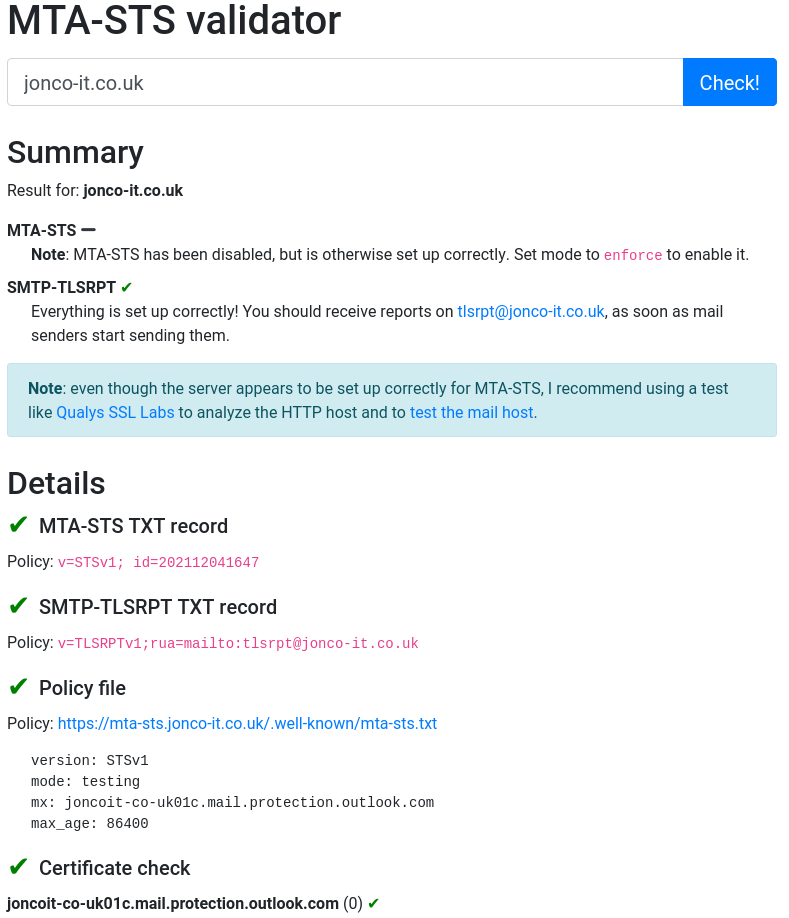
You'll note from the screenshot that MTA-STS claims to be disabled at the moment - that's a result of being in testing mode. Once we're happy our email server is correctly configured we can change our policy to say mode: enforce. I leave it to the reader (and system administrator) to choose when it's appropriate to do that.
The observant among you will note the MTA-STS validator screenshot mentions SMTP-TLSRPT which is a reporting mechanism for SMTP connections into your mail server. It's worth having SMTP TLS reporting configured as compatible senders will generate a report that you'll receive detailing successful and failed TLS connections to your mail server. This can be a useful indicator as to whether or not you're ready to move to enforce mode. If connections regularly fail then your mail server configuration may need changing.
What happens when I turn on enforce mode?
Senders that obey MTA-STS will only send you email over encrypted connections. If your server stopped supporting TLS connections then you would not receive emails from those senders.
Further reading
The UK's Nation Cyber Security Centre has an excellent article on MTA-STS and how to use it. Their article helped inform some of my thinking while configuring this for myself.
More details on MTA-STS can be found in RFC8461 which explains the requirements and how the system operates.
Conclusion
In this tutorial we've used Azure DevOps and git to host a Static Web App that contains our MTA-STS policy. We used Azure Resource Groups to make it easier to delegate control of this setup in future and will have made changes in DNS to make our policy accessible.
Banner image: Azure logo with logos of the various components involved in the MTA-STS setup.